
Pick your mountain
Open Cardio Command on your Apple Watch. The first screen is the mountain list. Tap the one you want to climb. Mountains you haven't unlocked yet are grayed out — finish the previous peak to open the next.
From picking your first peak to decoding every number on the Watch face — plus every workout program explained, so you can match the science to your goal.
Navigation is a straight line: mountain → program → duration → climb. No settings to dig through before every session.
Open Cardio Command on your Apple Watch. The first screen is the mountain list. Tap the one you want to climb. Mountains you haven't unlocked yet are grayed out — finish the previous peak to open the next.
Each mountain offers all compatible workout programs. If a program isn't available for your selected duration, it shows a lock icon with a one-line reason. Storm Shelter has its own entry point — look for it at the bottom of the mountain screen.
Main game sessions come in 20, 30, 45, and 60 minutes of workout — and every session adds a gentle 3-minute warm-up on top, so the picker shows the real total (a 20-minute workout runs 23 minutes with the warm-up). Not every program works at every length — Tabata is 20 or 30 min only; Zone 2 needs 45 or 60. Storm Shelter is 5, 10, or 15 minutes and skips the warm-up — it's already a wind-down. Pick your duration and tap Start.
The Active Climb screen is dense by design — it has to work on a 38mm watch while you're breathing hard. Here's the translation.
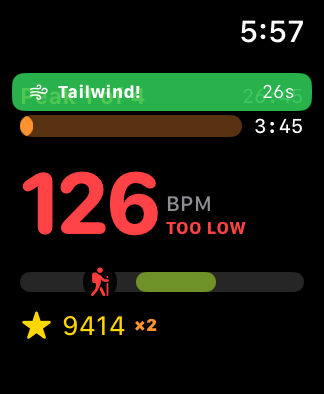
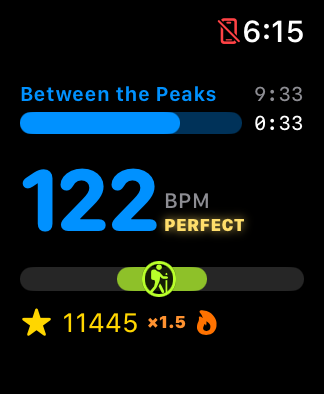
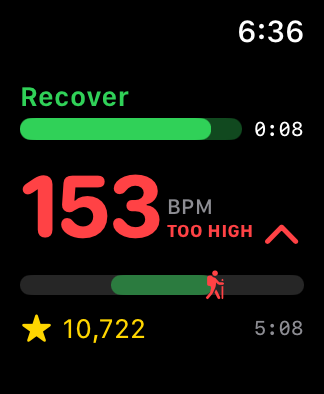
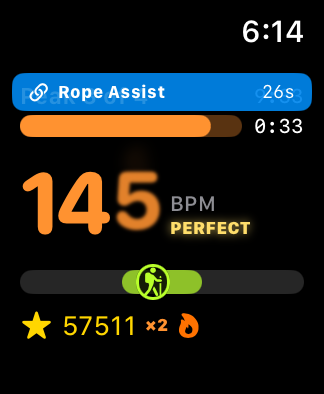
The top two lines carry both clocks and your current phase. Line one is the phase name ("Summit Push," "Between the Peaks," "High Camp") with the time left in the whole climb on the right. Line two is a progress bar for the current phase with that phase's own countdown beside it.
The two clocks read as different scopes on purpose: the dim one is the whole climb, the bright one is the interval in front of you.

Your heart rate is read by the Watch's optical sensor and updated approximately every 5 seconds — the same ~5-second cadence that drives all game state. The number is always your most recent actual reading, not an estimate.

The zone bar is a horizontal strip that represents your full heart rate range. A green band marks the current target zone. A small climber figure sits at your exact current HR position — inside the green band means you're scoring.

The bottom row is score on the left, then your active difficulty multiplier, then the streak flame. The clock used to live here and moved up to the phase header — the row was too crowded and the score kept truncating.

Ten points a second while you're inside the band, and nothing at all while you're outside it. Everything else is a multiplier on top of those ten points.
Inside the band scores. Within 3 bpm of dead centre scores 20% more, and the label under your heart rate switches from IN ZONE to PERFECT so you know you've found it. This is the difference between finishing a program and perfecting it.
An unbroken run inside the band multiplies your rate: ×1.5 at fifteen seconds, ×2 at thirty, ×3 from a minute onward. Leave the band and the streak resets to zero — which is what makes the last thirty seconds of an interval interesting.
The mountain multiplies everything: ×1 on Grouse, ×1.5 on Whitney, ×2 on Kilimanjaro, ×3 on K2, ×5 on Everest. Identical precision is worth five times more up there, which is the whole reason to go.
A dead-centre minute-long streak on Everest is 10 × 3 × 1.2 × 5 — thirty times what the same second earns from a standing start on Grouse. Surviving a dynamic event adds its own bonus on top of that.
A flame beside your score tracks the current streak. The score multiplier stops climbing after a minute, but the flame doesn't — it escalates in colour through seven tiers while the target band behind it brightens and thickens in step, so a good climb visibly heats up.
At five, ten, twenty and thirty minutes the flame stops being a glyph and expands to announce the milestone — with a sound, if you have audio on.
You should not have to raise your arm to know how you're doing. Cardio Command has a spoken-and-tonal cue vocabulary for the moments that matter, and it plays over whatever else you're listening to.
One setting, three positions — and it's independent of the music setting, so the two never fight.
Cues route wherever your Watch audio already goes — the built-in speaker or Bluetooth headphones. There's nothing to pair or configure.
A second, separate setting for the music bed. Whatever you pick, the cues above duck it briefly and let it back up — the same way turn-by-turn navigation does.
Nothing underneath. Tones and haptics against silence — the default, and the option that leaves your ears alone if you're outdoors and want to hear traffic.
Keep listening to whatever you already had playing — Music, a podcast, anything. Cardio Command doesn't take it over; it ducks under its own cues and comes back. A Now Playing page sits one swipe from the game screen for skips and volume, so you never have to leave the climb.
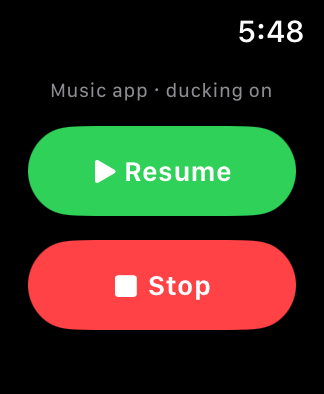
Original instrumental beds written for this, in three packs matched to the shape of what you're running:
Ridgeline suits Summit Expedition and Tempo; Whiteout suits Zone 2 and Valley Trek; Scree suits Tabata, 30/30 and 10-20-30. There are no transport controls by design — Trail Radio is scenery, not a playlist to manage mid-interval.
All audio, including Trail Radio, is in the free tier.
You don't have to watch the screen every second. The Taptic Engine signals the key moments.
Gentle double-tap when your HR moves inside the green band. Keep going — you're scoring.
Three rising taps when the current phase is about to end. Prepare to shift effort up or down.
A single sharp tap when your HR exits the band. One alert, then silence — constant nagging would ruin the run and drain the battery.
Two things the watch now does for you: it eases you in, and — on the interval programs — it calls out exactly what to do second by second.
Every session (except Storm Shelter) opens with a 3-minute warm-up whose target rises from your resting heart rate up to the first zone. You're never told "too low" and never pushed to sprint from a standstill — just ease up as the target climbs. It's added on top of your workout, so a 20-minute session is 23 minutes door to door.
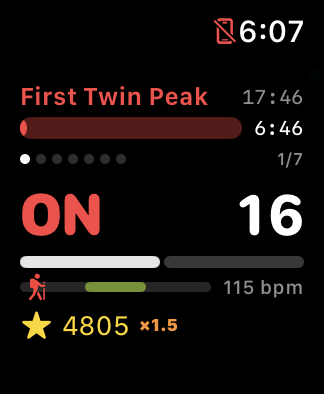
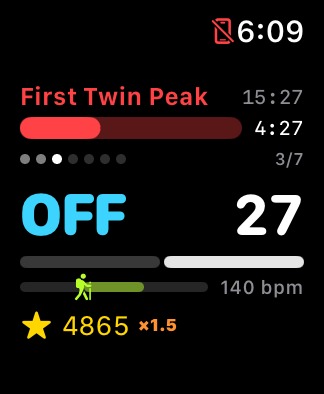
Inside a Lightning Ridge, Rhythm Route, or Twin Peaks block, the screen switches to a big action word — BURST/REST, EASY/MODERATE/ALL-OUT, or ON/OFF — with a seconds countdown, dots for which round you're on, and a haptic at every switch. Now you actually run the intervals instead of just holding the zone.
Random events fire during your climb — each lasting 30 seconds — 45 for Rockfall. They keep sessions from feeling scripted and separate a good climber from a great one.
The target zone narrows by 5 bpm for 45 seconds. The margin for error shrinks — thread the needle or lose your streak.
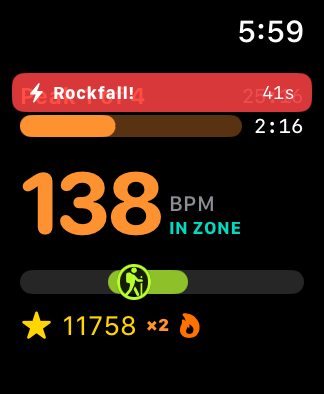
The zone drops 10 bpm unexpectedly. Your climber staggers. Pull back your effort quickly or you'll overshoot the new target.
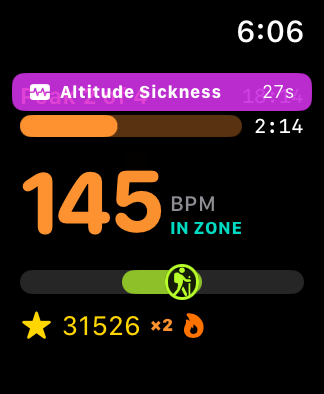
Good news: the zone widens 5 bpm for 30 seconds and your score multiplier jumps. Breathe into it.
Your HR number disappears for 30 seconds. Navigate entirely by effort and haptics. This is the standout mechanic — it forces you to feel your exertion rather than read it. Surviving in-zone earns the Whiteout Survivor badge.
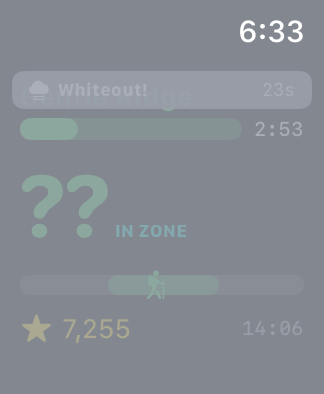
A grace period: the zone holds completely steady for 30 seconds regardless of what the script says. Recover without penalty.
The same guide that's built into the iPhone app: the science behind each protocol, the shape of the session drawn as a heart-rate ridgeline, and the zones it targets. Every one is a real interval-training protocol from sports-science research.
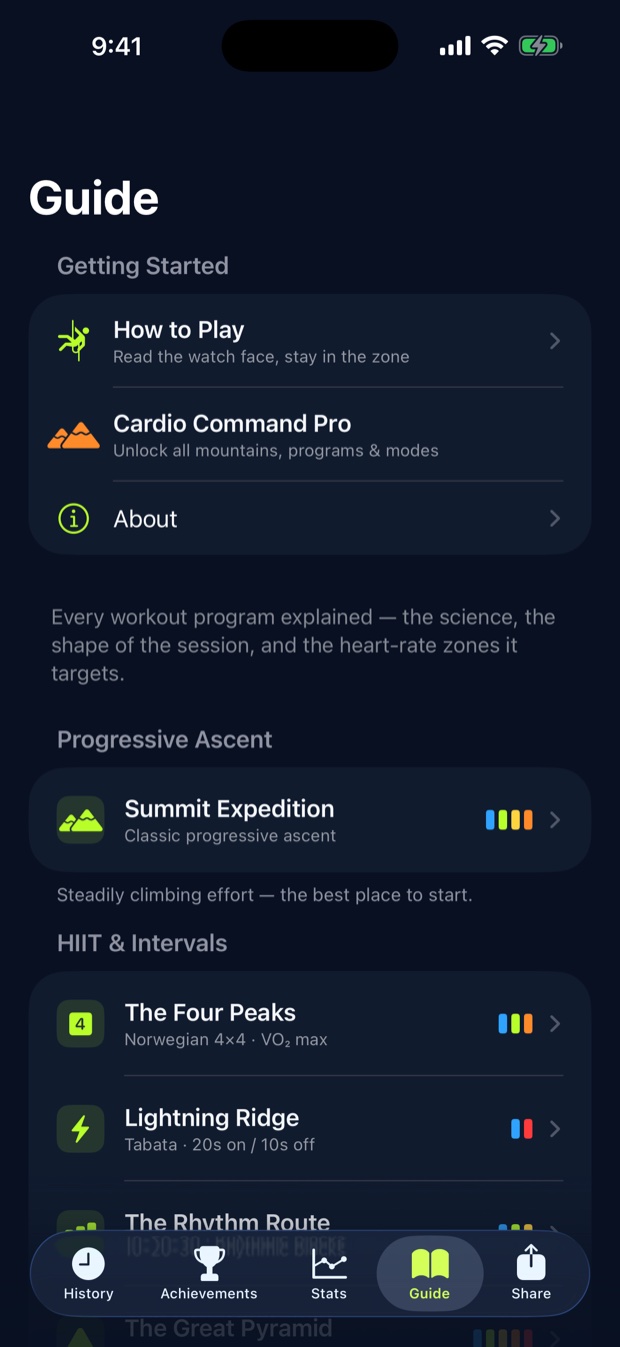
Steadily climbing effort — the best place to start.
The best place to start. Zones climb steadily from an easy base through aerobic work to a hard summit push, then descend to recover — the shape of a well-structured cardio workout.
Each session adds a gentle 3-minute warm-up on top of the length shown.
Hard efforts broken up by recovery. Big fitness gains.
The most-studied HIIT protocol for VO₂ max. Four 4-minute efforts at Zone 4, each followed by 3 minutes of active recovery. Research shows large VO₂ max gains — even in cardiac-rehab patients.
Each session adds a gentle 3-minute warm-up on top of the length shown.
Dr. Izumi Tabata, 1996. Each 4-minute block is eight rounds of 20 seconds all-out / 10 seconds rest. Supramaximal intensity that taxes aerobic and anaerobic systems at once — huge calorie burn in little time. The Watch cues every burst and rest.
Each session adds a gentle 3-minute warm-up on top of the length shown.
Jens Bangsbo, University of Copenhagen. Repeating minute cycles of 30s easy / 20s moderate / 10s maximal, grouped into 5-minute ridges. Improved 5K times by ~38 seconds on average — and testers found it genuinely fun. The Watch gives a 7-second cue before each sprint.
Each session adds a gentle 3-minute warm-up on top of the length shown.
Ascending-descending intervals. Efforts climb from short-and-hard up to the long peak, then step back down through shortening pushes. Builds speed and endurance together — a staple in competitive running and cycling.
Each session adds a gentle 3-minute warm-up on top of the length shown.
30 seconds at Zone 5 / 30 seconds active recovery, clustered into two long blocks. Recovery is too short for your heart rate to fully drop, so you bank real time near VO₂ max. Hard, efficient, repeatable. The Watch cues each ON and OFF.
Each session adds a gentle 3-minute warm-up on top of the length shown.
Sustained hard efforts that raise your ceiling.
Sustained effort near lactate threshold — the pace your body can just barely clear lactate at. Two long Zone 4 blocks with a short active-recovery shoulder between them. Tightest zone tolerance of any program; extends how long you can hold a hard pace.
Each session adds a gentle 3-minute warm-up on top of the length shown.
Long, easy work that builds your aerobic engine.
Long, easy, sustained effort at Zone 2. Builds mitochondrial density and fat-burning base over weeks — championed by endurance athletes and longevity researchers. The real challenge is staying easy when you want to push. No dynamic events; scenery clears as you hold the zone.
Each session adds a gentle 3-minute warm-up on top of the length shown.
Unpredictable surges or a guided wind-down.
Swedish for “speed play.” Unstructured surges at unpredictable intensities and lengths — generated fresh each run, so you never know what's coming. The chart below is just one example; the Summit Card reveals the shape you actually climbed.
🔀 Every run is generated fresh — this is one example shape.
Each session adds a gentle 3-minute warm-up on top of the length shown.
A trapped climber needs help. High-intensity ascents alternate with controlled active-recovery descents — HIIT with a purpose. Zone jumps arrive with an advance warning so you can prepare for the next surge. Unlocks on Mount Whitney.
Each session adds a gentle 3-minute warm-up on top of the length shown.
A guided wind-down. Instead of a fixed target, Storm Shelter reads your current heart rate at the start and walks it down, zone by zone, to calm — so every session is different. No warm-up and no events; ideal after a workout or for stress relief. The example below starts from Zone 4. Available on every mountain.
Every climb syncs automatically from your Watch. The iPhone app has four tabs — here's what each one does.
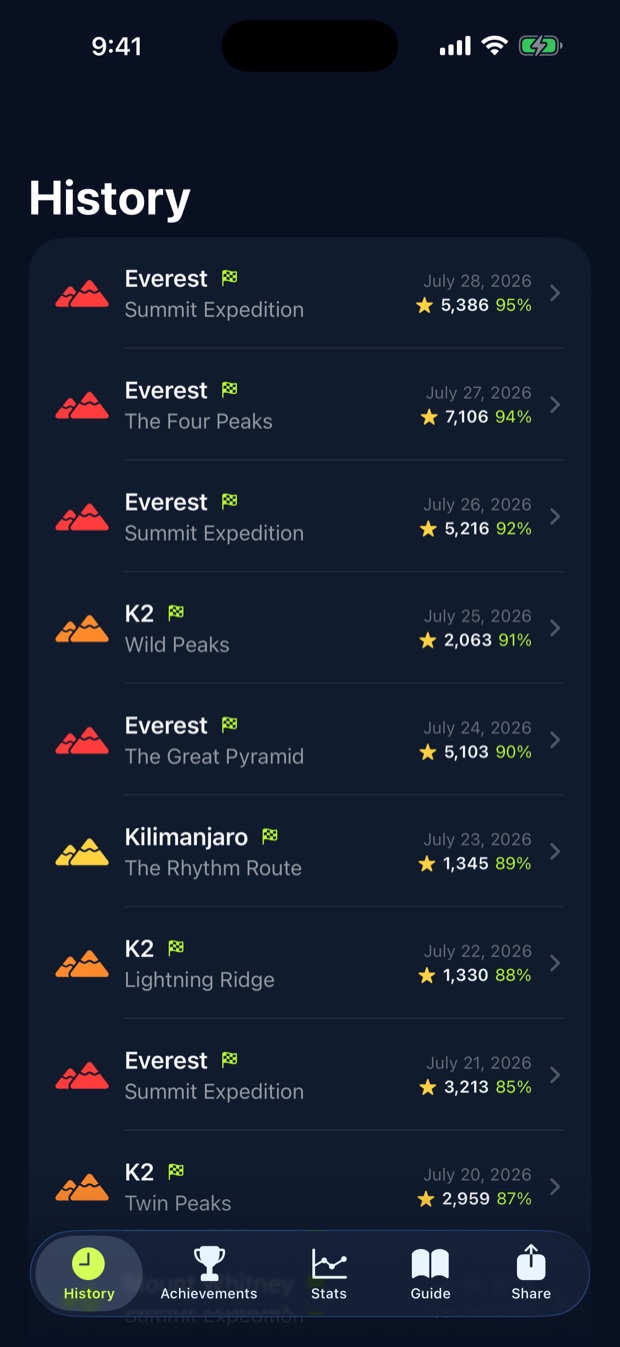
Every climb, newest first. Each row shows the mountain, program, date, score, and % in zone. Tap any climb for the full Summit Card at high resolution, a detailed HR elevation chart, and the badges you earned that session.
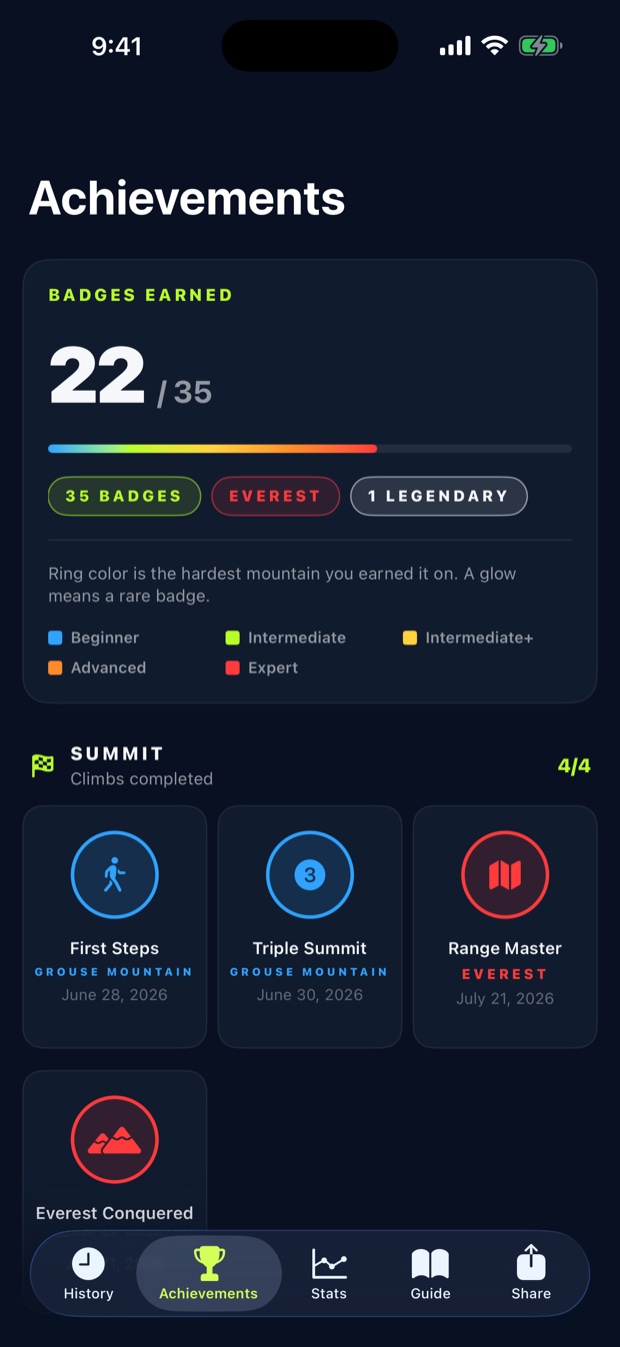
Every badge in one place, each tinted by the hardest mountain you earned it on and grouped by track. Earned badges show the date you unlocked them; unearned ones show a progress ring, so you know exactly how close you are.
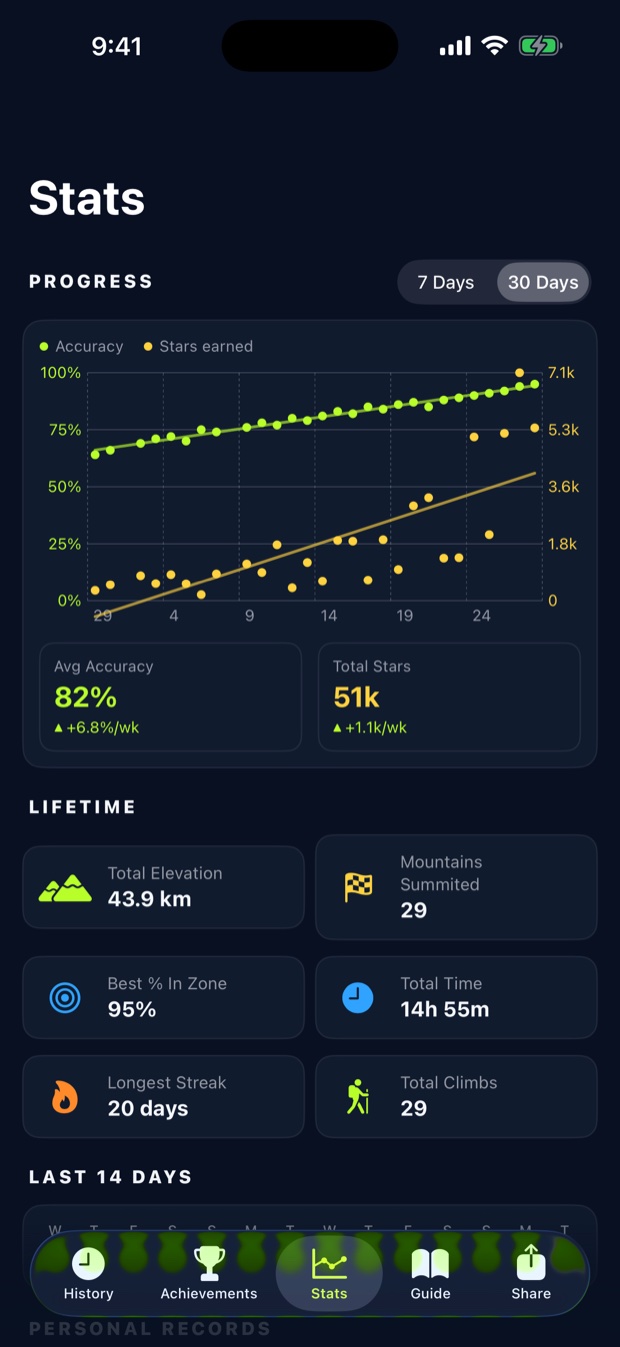
Lifetime tiles: total elevation gained, mountains summited, best % in zone, total time on mountain, current streak, and total climbs. A 14-day streak calendar and per-mountain personal records round it out.
Pick any climb, get the full Summit Card preview, and share via the standard sheet — Messages, Photos, AirDrop — or export a pre-cropped 1080×1920 card built for Instagram Stories. The Watch renders the card immediately post-climb; the iPhone re-renders at 3× resolution for sharing.
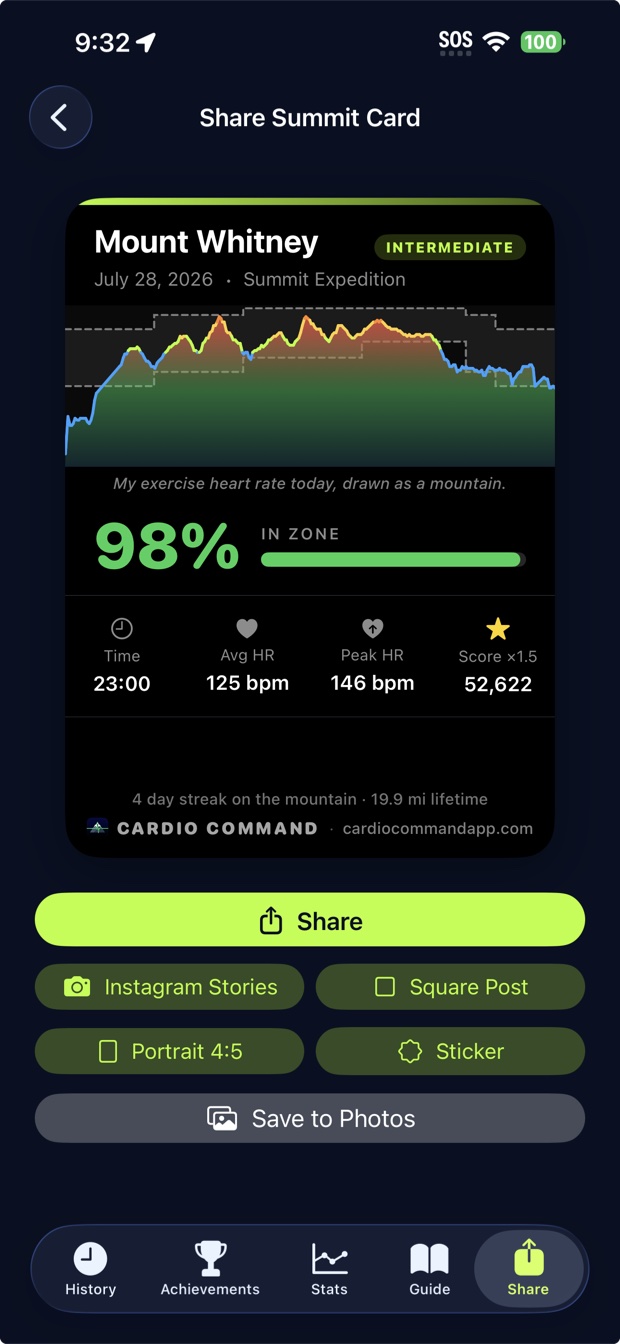
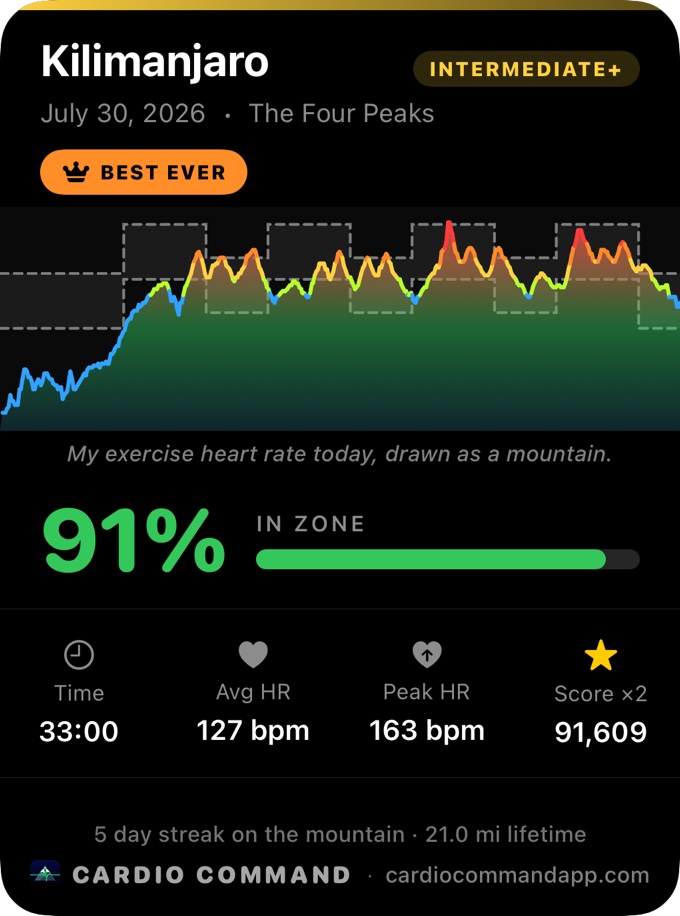
Generated automatically the moment a session ends. Your heart rate over the whole climb is drawn as a continuous mountain skyline, coloured by the zone you were in — and behind it, as a dashed outline, the corridor the program actually asked you to hold. The gap between the two is your climb. No two cards look alike.
Five tracks — Summit, Precision, Event, Dedication, and Collector. Each badge has one specific unlock condition and none are participation trophies. In the iPhone app every earned badge is ringed in the colour of the hardest mountain you earned it on, and the rare ones glow.
Climbs completed.
Complete your first climb.
Complete 3 climbs.
Summit all 5 mountains.
Complete Everest on any program.
How well you held the zone.
80%+ time in zone on any climb.
5 minutes within 3 bpm of zone center.
90%+ time in zone on Expert difficulty.
60-second continuous in-zone streak.
90%+ in zone on Everest with zero exits.
Surviving dynamic events.
Survive a full Whiteout without leaving zone.
Trigger 10 total dynamic events (lifetime).
Complete any Storm Shelter session.
Finish a climb with zero zone exits.
Going the distance.
Finish a 60-minute session.
Storm Shelter at all three lengths — 5, 10 & 15 min.
Climb 7 days in a row.
100 km of lifetime elevation gained.
Complete all nine interval programs.
In the iPhone app every earned badge is ringed in the colour of the toughest mountain you've earned it on — electric blue for Grouse through red for Everest — so the grid doubles as a map of how far up you've actually been. Rare badges glow; the rarest get a second ring.
Unearned badges keep a progress arc instead, so you can always see which one you're closest to.
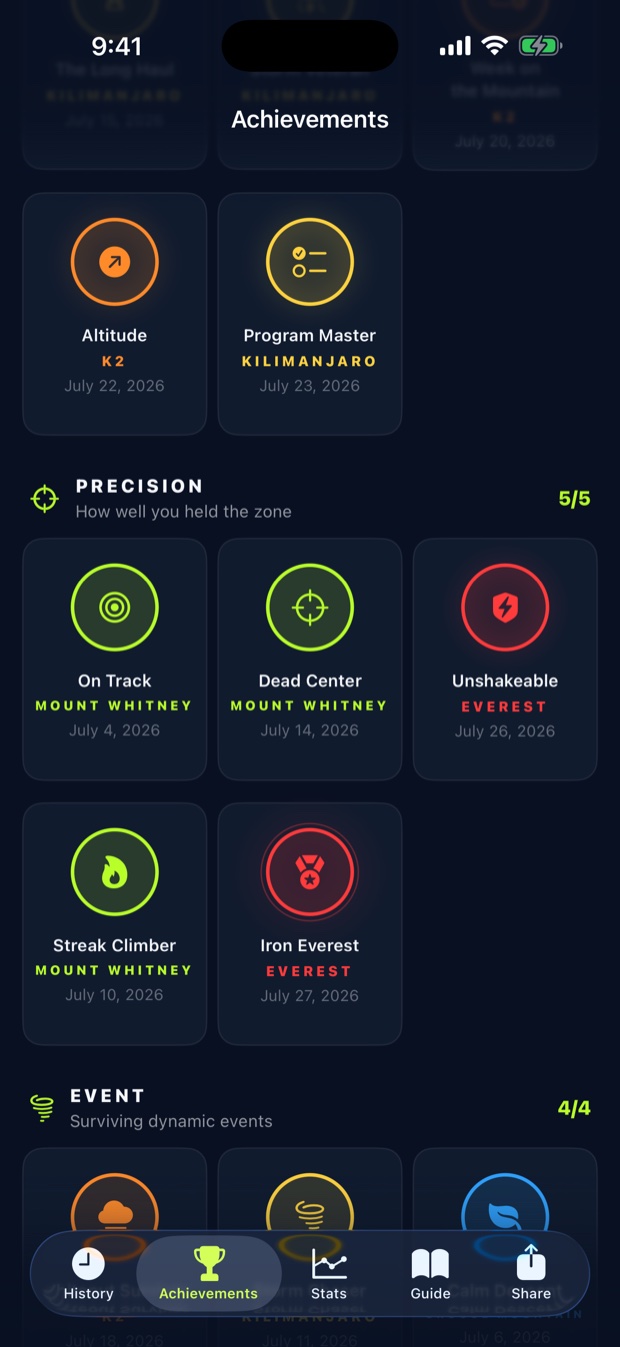
Rare and unusual finds — scarcity, identity, and loyalty rather than volume.
Climb before 6 am, five times.
Climb after 10 pm, five times.
Survive three or more dynamic events in one climb.
Survive a Whiteout and finish 90%+ in zone, same climb.
Climb on February 29. Once every four years.
Climb on January 1.
Climb on the summer solstice.
Plus a loyalty pair for each of the five mountains — Local at ten climbs, Legend at a hundred:
10 / 100 climbs on Grouse Mountain.
10 / 100 climbs on Mount Whitney.
10 / 100 climbs on Kilimanjaro.
10 / 100 climbs on K2.
10 / 100 climbs on Everest.
Onboarding sets your zones from your age together with your heart-rate history in Apple Health, taking whichever gives the higher max — or you can enter a max heart rate manually if you know yours. Either way, these are the five targets the game uses. Reading Apple's own computed zones directly arrives with watchOS 27.
| Zone | % of Max HR | In-game phase | How it feels |
|---|---|---|---|
| Zone 1 | 50–60% | Warmup, cooldown | Easy conversation pace |
| Zone 2 | 60–70% | Forest Trail, active recovery | Could hold a sentence |
| Zone 3 | 70–80% | High Camp, aerobic work | Breathing hard, short phrases only |
| Zone 4 | 80–90% | Summit Push, HIIT intervals | Can't talk much |
| Zone 5 | 90–100% | Tabata sprints, Twin Peaks bursts | All-out, unsustainable |
The program decides which zones you're asked to hold — never the mountain. Run Lightning Ridge on Grouse Mountain and you'll be in Zone 5; run Valley Trek on Everest and you'll spend the session in Zone 2. What the mountain changes is how much margin you get: how wide the target band is, how much warning you get before it moves, and how much the climb is worth.